Over the past two decades, Peter Blasser has designed a myriad of musical instruments–all positively quirky, whimsical, bizarre, playful, and infinitely inspiring. Amongst the myriad of noise-and-music machines created by Blasser, Cocoquantus stands out as one of the most favored inventions among the Ciat-Lonbarde's loyal fan base. In part due to its unique lo-fi charm, in part because of the breadth of its possible applications, and surely not excluding Blasser’s trademark enigma-imbued ethos, Cocoquantus is a piece of music technology unlike anything else out there.
 Ciat-Lonbarde Cocoquantus 2 Looping Delay + Synthesizer$1,849.00Preorder Reserve your order today!
Out of Stock
We're awaiting our next batch of this item. Pre-order to reserve your place in line and we'll fulfill your order as soon as we receive our shipment
Cocoquantus, in various incarnations of its basic concept, has been around for quite some time—but its mischievous character persists, and it remains one of the most perplexing pieces of music gear today. My personal experience with the instrument is approaching the five-year mark, and I can honestly say that although I know the ins and outs of the instrument quite well, it still manages to surprise and inspire me.
This article will be a reflection on the instrument based on my personal experience. I plan to dive as deep as seems feasible, discussing the details and quirks of the instrument. So if that sounds interesting to you, welcome to the world of Cocoquantus—a machine that wraps and bends time, forges organic textures, and occasionally bursts into shards of quantum noise.
Hello Coco
It feels apt to begin our journey by addressing the questions: what is Cocoquantus, and where did it come from? The current Cocoquantus 2 is the final segment in the “Coco” instrument lineage, preceded by such instruments as Ambrazier, Srine, Tranoe, Cocolase, and Cocostuber.
All of the instruments in the series are based on a pair of crunchy 8-bit delay chips and are configured for stereo processing. A Coco is what Blasser calls that delay module, and in different instruments in the series, Cocos have been outfitted with modulation slots for modification and recontextualization of the incoming audio. In Cocoquantus specifically, the feature set of the module is maxed out.
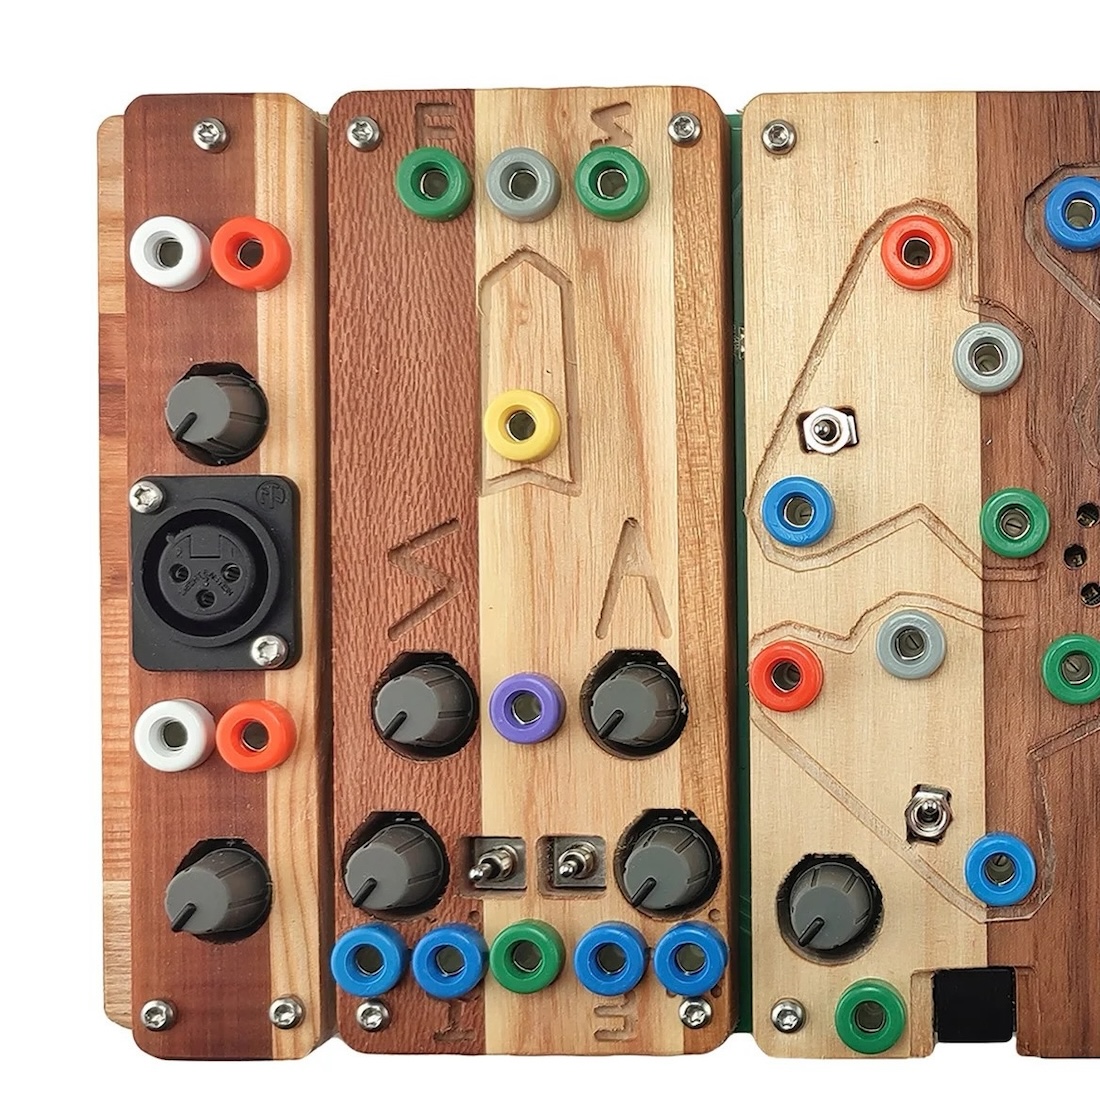
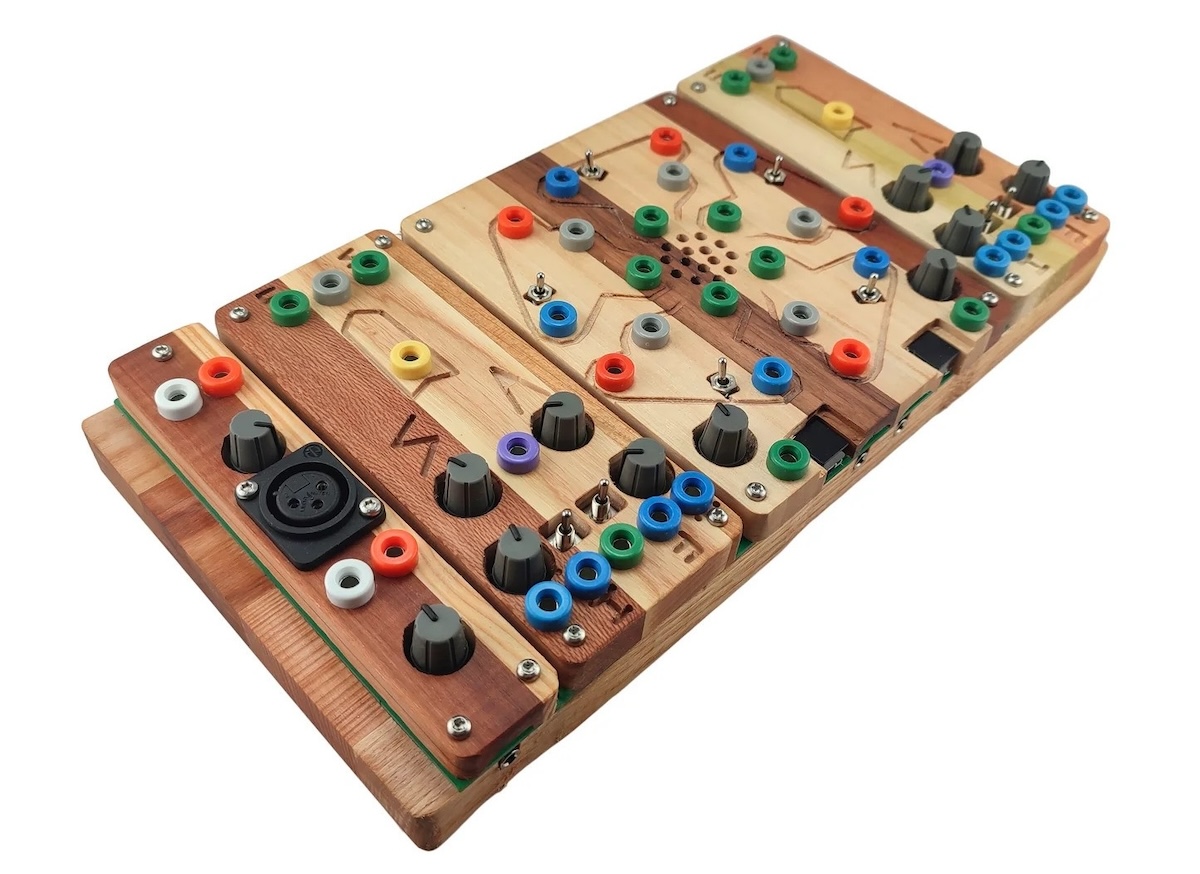
[Above: detail of the input preamp and a Coco.]
In Cocoquantus, the bottom section of each of the two identical Cocos is furnished with a sensitive input, accessed via the green jack in the middle. To the left is the control knob for the input level, accompanied by a pair of classic C-L verso/inverso VCA inputs, as well as a Dolby aka noise-filter switch. The bottom-right area of the module features the same set of controls, albeit here assigned to the feedback amount/loop level.
The Dolby switches deserve some attention, as upon the first encounter it may be not entirely clear what they do. The functionality is identical on both the Input and Feedback channels. The middle position of the switch indicates that the noise filter is inactive. In the upward position, the noise gate is engaged, passing through the signal above a certain amplitude threshold, otherwise cutting it off entirely. In the downward position, the Input and Feedback outputs become interlinked, as the noise gate is activated when signal is detected on the other channel. This opens up a few possibilities for interaction between the direct and delayed signals, and of course, reduces the amount of noise in the output.
The centrally-located purple input on the Cocos is for modulating the playback speed of the sound in the delay buffer. It is accomplished by the ‘S’-labeled control to the left, which sets the length of the buffer/delay time, and the ‘^’-marked knob for dialing in the desired amount and direction of the modulation. It is worth noting that in ‘Coco’ the length of the delay line is proportionally connected to the bit depth parameter. That is, shorter buffers result in higher resolution of the delayed sounds. Extending the length of the buffer results in lowered quality of the sampled/delayed sound, and added crunchiness. Cocos can get quite noisy—however, this noise is intentional, and it contributes significantly to the sonic charm of the instrument.

Above the rate control, the bright yellow banana socket (previously known as the “iron cross”) is a special kind of output on a Coco based on the continuous readout of the internal digital circuitry of the module. In practice, it outputs a rich square wave, notable for its organ-like quality. This output can be useful both as an audible source for building textures, and for modulating various parameters within the device.
At the top of each Coco is a trio of banana sockets. Green jacks are modulation inputs: the left one, 'Flip', is used for reversing the buffer content, and the right one, 'Skip', is for resetting the loop to the beginning. The gray jack outputs the delayed signal, useful for further processing elsewhere or for audio-rate modulation of other parameters.
Coco essentially operates in one of two modes. By default, the module is constantly recording the signals coming into its buffer, functioning just like a delay. However, by pressing the buttons located next to each Coco, we disengage the recording, and the last recorded audio segment is looped until we restart the recording. Notice, that the delay line or sample in the buffer can be modified in the same way.
Hello Quantussy
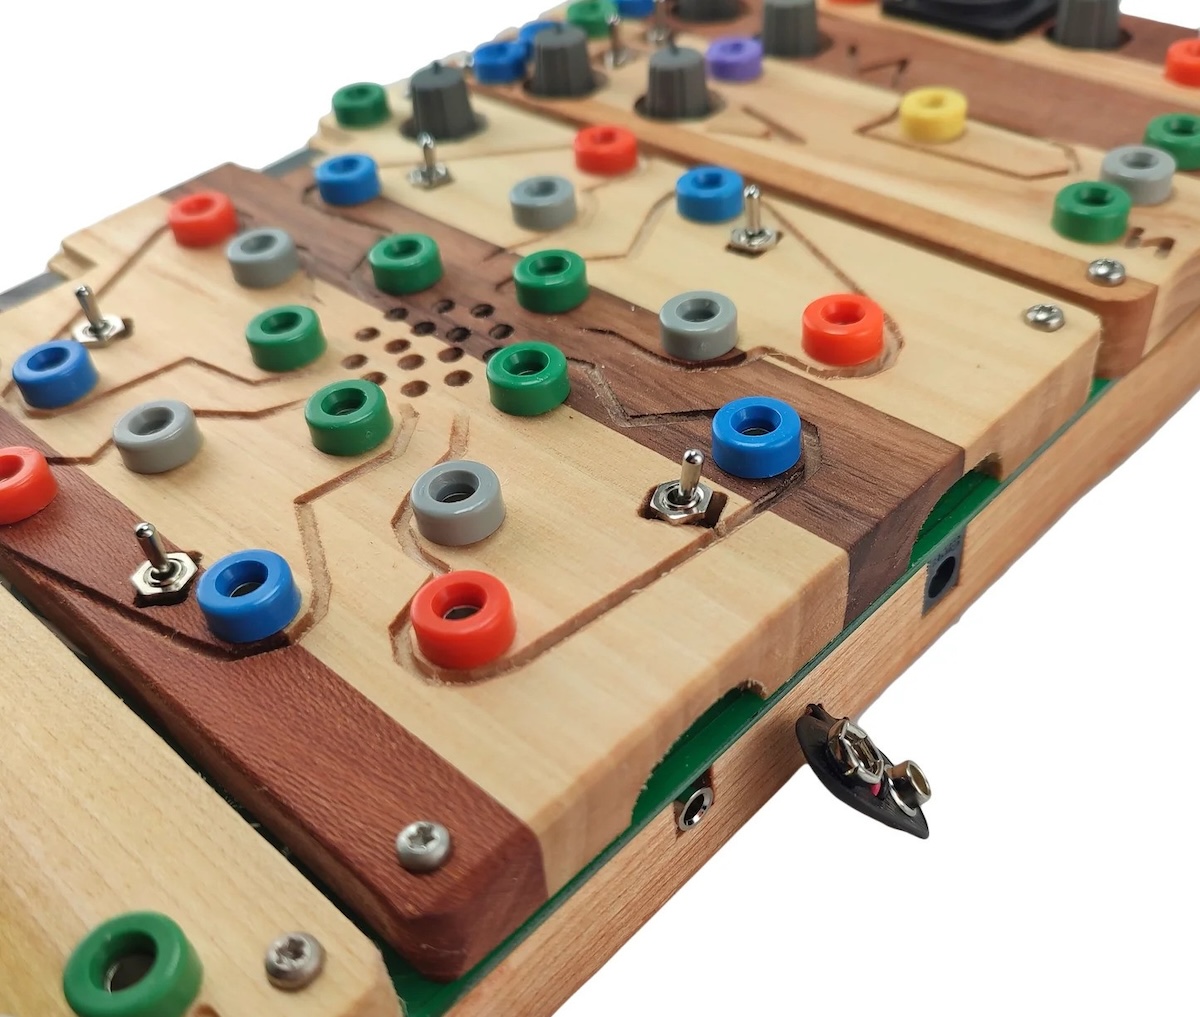
Each incarnation of the Coco series devices featured some sort of modulation hub and/or gestural interface for interacting with the delay modules. In Cocoquantus, this job is handled by the Quantussy module—a five-oscillator network sandwiched between the instrument's two Cocos. Quantussy, permeated by Blasser's customary allusion to chaos theory and quantum physics, is far more potent than a regular LFO or even an oscillator bank. It can be used simultaneously to craft simple and complex modulation and audio signals.
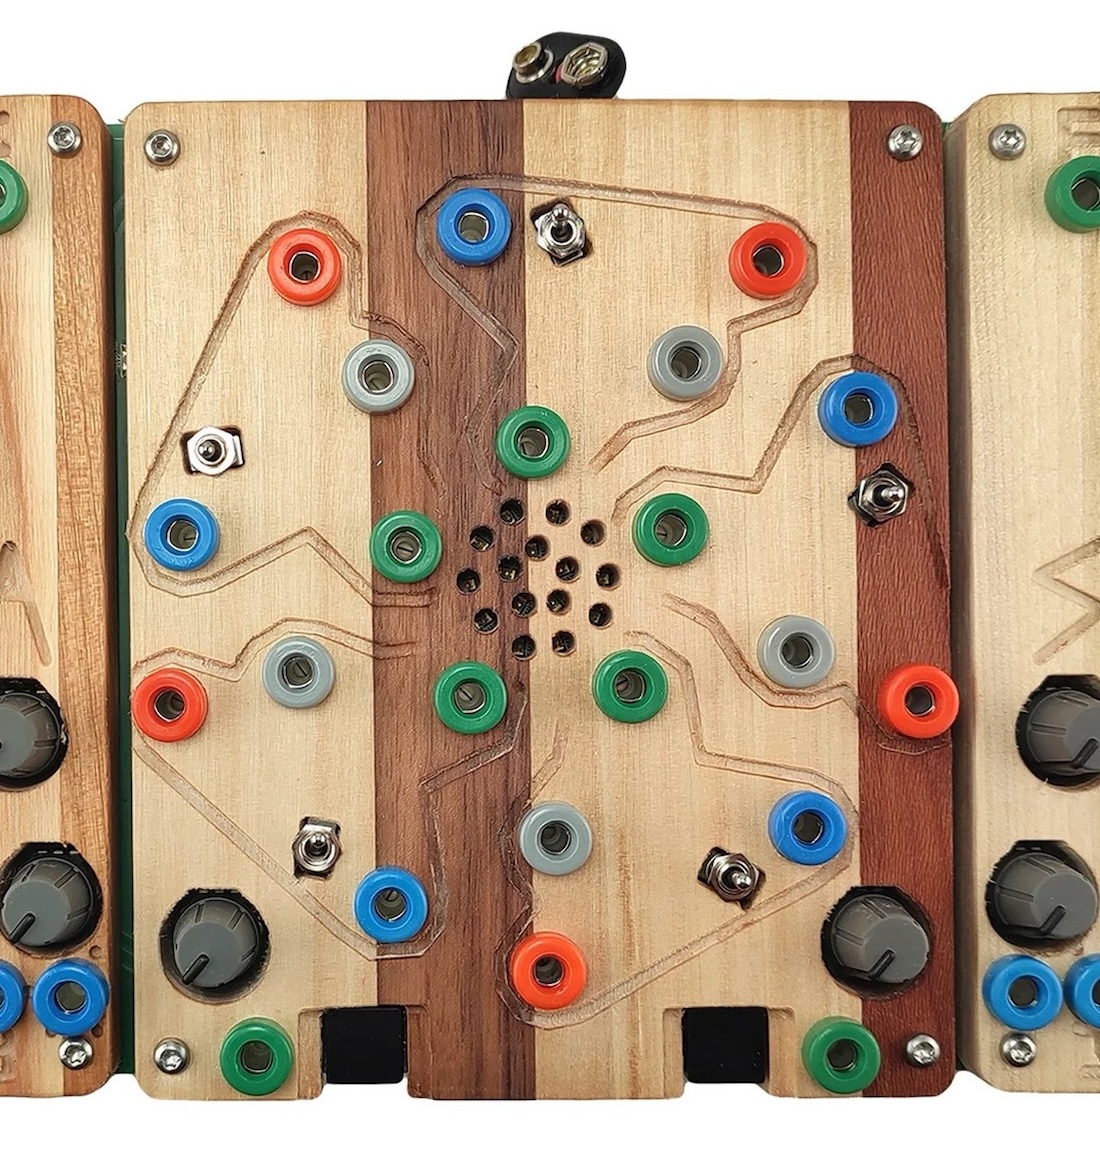
[Above: detail of the Quantussy on a current-day Cocoquantus. Older versions may feature a central "lozenge" above the LEDs.]
The module is broken down into five oscillator "petals," arranged in a circle. Each petal includes four banana jacks and a three-position switch. The switch determines the frequency range of the oscillator. The middle position sets the oscillator to the audio range. With the switch moved inward toward the center of the device, the oscillator is in the infrasonic range. The switch being turned outward corresponds to a low-mid range which Blasser refers to as "Balcium." Orange and gray jacks on each petal are outputs, where the former passes the triangle wave, and the latter produces a square-type output. The blue socket is a frequency modulation input.
Lastly, the green jack, positioned toward the center, is an input for switching between oscillator modes, a feature that connects us directly to the mesmerizing light display at the device's center. This network of fifteen colored LEDs is not purely aesthetic: it serves as a live indicator of the state of all oscillators—the "Spesal State" of the device, in C-L lingo. So, that all in mind...what is going on here?
You see, the five oscillators on the Quantussy are interlinked. Under the hood, the square wave output is clocking a pair of sample-and-holds. The triangle output of one oscillator is sampled by one of them, and its output is known as the "castle" output. The second sample-and-hold is capturing the "castle" out of yet another oscillator in the network. The green jack on the oscillator petal is connected to the counter, which steps through the pairings of oscillators. Three LEDs—red, blue, and yellow—reflect how the oscillator network is restructured.
Importantly, the Quantussy is not permanently in a state of chaos. The complexity is approached very elegantly, managed just by two controls: the Master Frequency knob placed at the bottom-left corner of the module, and the "chaos" knob on the right. The frequency parameter affects all of the oscillators proportionally to the specified range. Chaos is injected gradually as you move the knob clockwise, entering the state of "hyperchaos" at the outer limit, where fierce bursts of noise are sporadically interjected by blocks of silence.
As I’ve touched upon earlier, Quantussy is a hybrid sound/modulation source, and it is capable of some truly unruly behavior. However, whenever you need, it is always easy to return to something stable—usually with a single simple gesture.
Connecting With The World
Two Cocos and a Quantussy make for a great combo, and there is a bottomless ocean of sound to be discovered just within the interaction of these two elements. However, Cocoquantus is also wide open for processing external audio signals of various sources, and for this, it is equipped with a wealth of inputs.
The leftmost module on the device features a pair of preamps. The XLR jack is a microphone input. There is no phantom power, so it is most suitable for use with dynamic microphones. The 3.5mm port on the bottom-front of the module is a high-impedance input optimized for piezos, and suitable for amplifying electric guitars. Each of the two inputs is equipped with a dedicated level control and two banana jack outputs: the white jack carries the amplified signal, and the orange is the envelope follower output.
Cocoquantus also includes two more stereo inputs. These are great for linking up the device with synthesizers, and other line-level equipment—cassette and CD players, radio, or your phone. The left and the right channels of each stereo input are internally wired to each Coco. Unlike the microphone and Hi-Z inputs which have dedicated volume knobs, the stereo inputs are void of such. The idea is that one can just adjust the signal level at the source.
Cocoquantus, despite its full self-sufficiency as a musical instrument, is meant to be used in a symbiotic relationship with other instruments. Blasser recommends Sidrax and Tetrax organs as highly suitable companions, but the possibilities extend far beyond that, and the very process of experimenting with different sound sources can be vastly rewarding. Moreso, the abundance and, importantly, the variety of inputs on the device casts Cocoquantus as an apt center hub of a whole setup. A piece where a multitude of sounds converge to be decomposed and further recontextualized.
Playing The Cocoquantus
First, I would like to establish that while it is possible to use the processing and sound-generating features of the device independently, the nature of the relationships between these aspects is better viewed as synergistic. The control and audio signals in the Quantussy always influence each other, and they can be used in the Coco along with other signals in a wide variety of ways—as modulators, as sound generators, as a chaotic accompaniment to your external sounds, and more. Thus, Cocoquantus occupies something of a liminal space between an instrument and processor: it is both simultaneously.
Second, it is important to acknowledge the chaotic nature of the instrument. This doesn’t mean that the device always behaves unpredictably: it is quite easy to get quite stable results from Cocoquantus. Rather ,what it means is that one of the core strengths of the device is that it can be easily nudged into a sonic realm where its behavior is more reminiscent of a living organism than of a musical instrument. Embracing this aspect of Cocoquantus is vital. It means that you are not only playing the instrument, but playing with it. Interacting with Cocoquantus is always a matter of balance between control and chaos.
Third, something that is related to the previous point, because Cocoquantus is in itself a complex system, its state is heavily sensitive to the initially set conditions. Even a minor nudge of a knob or flick of a switch can have a significant impact. Importantly, given the explicitly modular aspect of the instrument, the quality and intensity of the effect are in large part determined by how the modules are interlinked. And that brings us to the topic of practical interaction.
Approaching Cocoquantus: Strategies for Interaction
Unlike some of the instruments in the C-L universe, such as Deerhorn and Plumbutter, or Sidrax and Terax, Cocoquantus does not feature any particularly distinct elements for interaction. There are no antennae, or wooden touch bars, just a handful of knobs, amidst an amalgamation of colored banana sockets unevenly divided across four wooden modules. So, I would like to dedicate this section to discussing different approaches and strategies for interacting with the instrument.
The first step in most cases of using Cocoquantus would likely be creating some sort of a patch. Unpatched, the Cocos, Quantussy, and Preamp modules are disconnected from each other. So for anything to happen between these three elements, the outputs of at least one of the Quantussy oscillators or an external signal from the Preamp module need to be patched into the inputs of each Coco. That said, since the two stereo inputs are internally wired to Cocos, no additional patching is necessary when using them. Simply running audio through Coco delays, and adjusting a few parameters can be very satisfying. I find the degraded, sizzling character of Coco delays produces rich and beautiful textures. However, things really pick up when Quantussy is added to the equation. It is in the interaction between these two modules where the true magic of Cocoquantus emerges. Cocos alone will take you back in time, but together with Quantussy, you can surf across the dimensions.
While patching the Cocoquantus can be seen as the first and essential way of interacting with it, the instrument is also highly tactile, and in principle, it adheres to the C-L motto of “touch-sensitive is the best.” Some of the previous incarnations of the device featured not banana sockets, but various kinds of patch studs, inviting the user to interject their body or any other conductive matter directly into the circuit. And if more permanent connections were necessary, alligator cables could be used. This form of interaction is still possible in the present version of Cocoquantus and can be simply accomplished with a set of bare banana jacks.
[Above: detail of the Cocolase—a Cocoquantus predecessor which used exposed screws in place of conventional "jacks" for patching.]
Admittedly, this dynamic patching technique is quite an expressive mode of interacting with the instrument, full of surprising and interesting sonic outcomes. However, the tactile interaction with the instrument is not limited to that, and gestures like momentarily changing the position of switches or manually adjusting parameters can be very effective. The pots, as is the case with all C-L instruments, have very little resistance, which may feel strange if you are used to applying a gentle force when turning knobs. However, this doesn’t affect the fine-tuning potential of the instrument—you can be very subtle with your adjustments. What does however open up here is an opportunity to be very expressive with your gestures, creating sudden transitions.
The Master Tune and Chaos controls are worth particular attention, as they can be a go-to point of interaction when you want to stimulate changes and transitions. As you remember, turning counterclockwise, collectively increases the frequencies of all oscillators in the case of one, while increasing the chaotic behavior of the oscillator network in the case of the other. In the relation between the two knobs, the Frequency control can be seen as the center frequency, and as you raise the Chaos control, you slowly pass through gentle and mild vibrato, to increasing stepped and sliding random sequences, to a point where continuous tones, noise bursts, stepped passages that at times seem to breach beyond the range of human hearing, and even silence are juggled at unpredictable intervals.
The level knobs are also as sensitive, and so with them, it helps to be a bit more mindful. The unity gain on both Input and Feedback controls is around noon. In the case of the Input, passing this point will start to overdrive the signal. On the side of Feedback, the effect is yet more drastic. At a notch short of noon position, Coco acts as something of a looper. Moving further, things start to escalate quickly, with cascades of mangled distorted echoes. So unless you are specifically after complete sonic mayhem, keep an eye on the Feedback level.
Finally, we need to address how the audio source itself can be used as an element of live interaction with the Cocoquantus. This is only possible if you are sending the signal into the device via one or both of its preamps, as each is equipped with a dedicated envelope follower. This is great for live interactive situations, where the intensity of your performance on a chosen instrument/sound object is used to dynamically modify the processed signal. This can be employed with a degree of subtlety when the dynamic contour is used to lightly modulate the speed of the delays. Or it can be set as a source of major changes, i.e. when sent into the "Spesal State" inputs of the active oscillators.
Alright, so let’s get to the practical part and take a look at a few patch examples. Think of the primers below as starting points that you can further tweak and develop. I decided to include these specific examples because I think they demonstrate a few possible gateways for interacting with the Cocos.
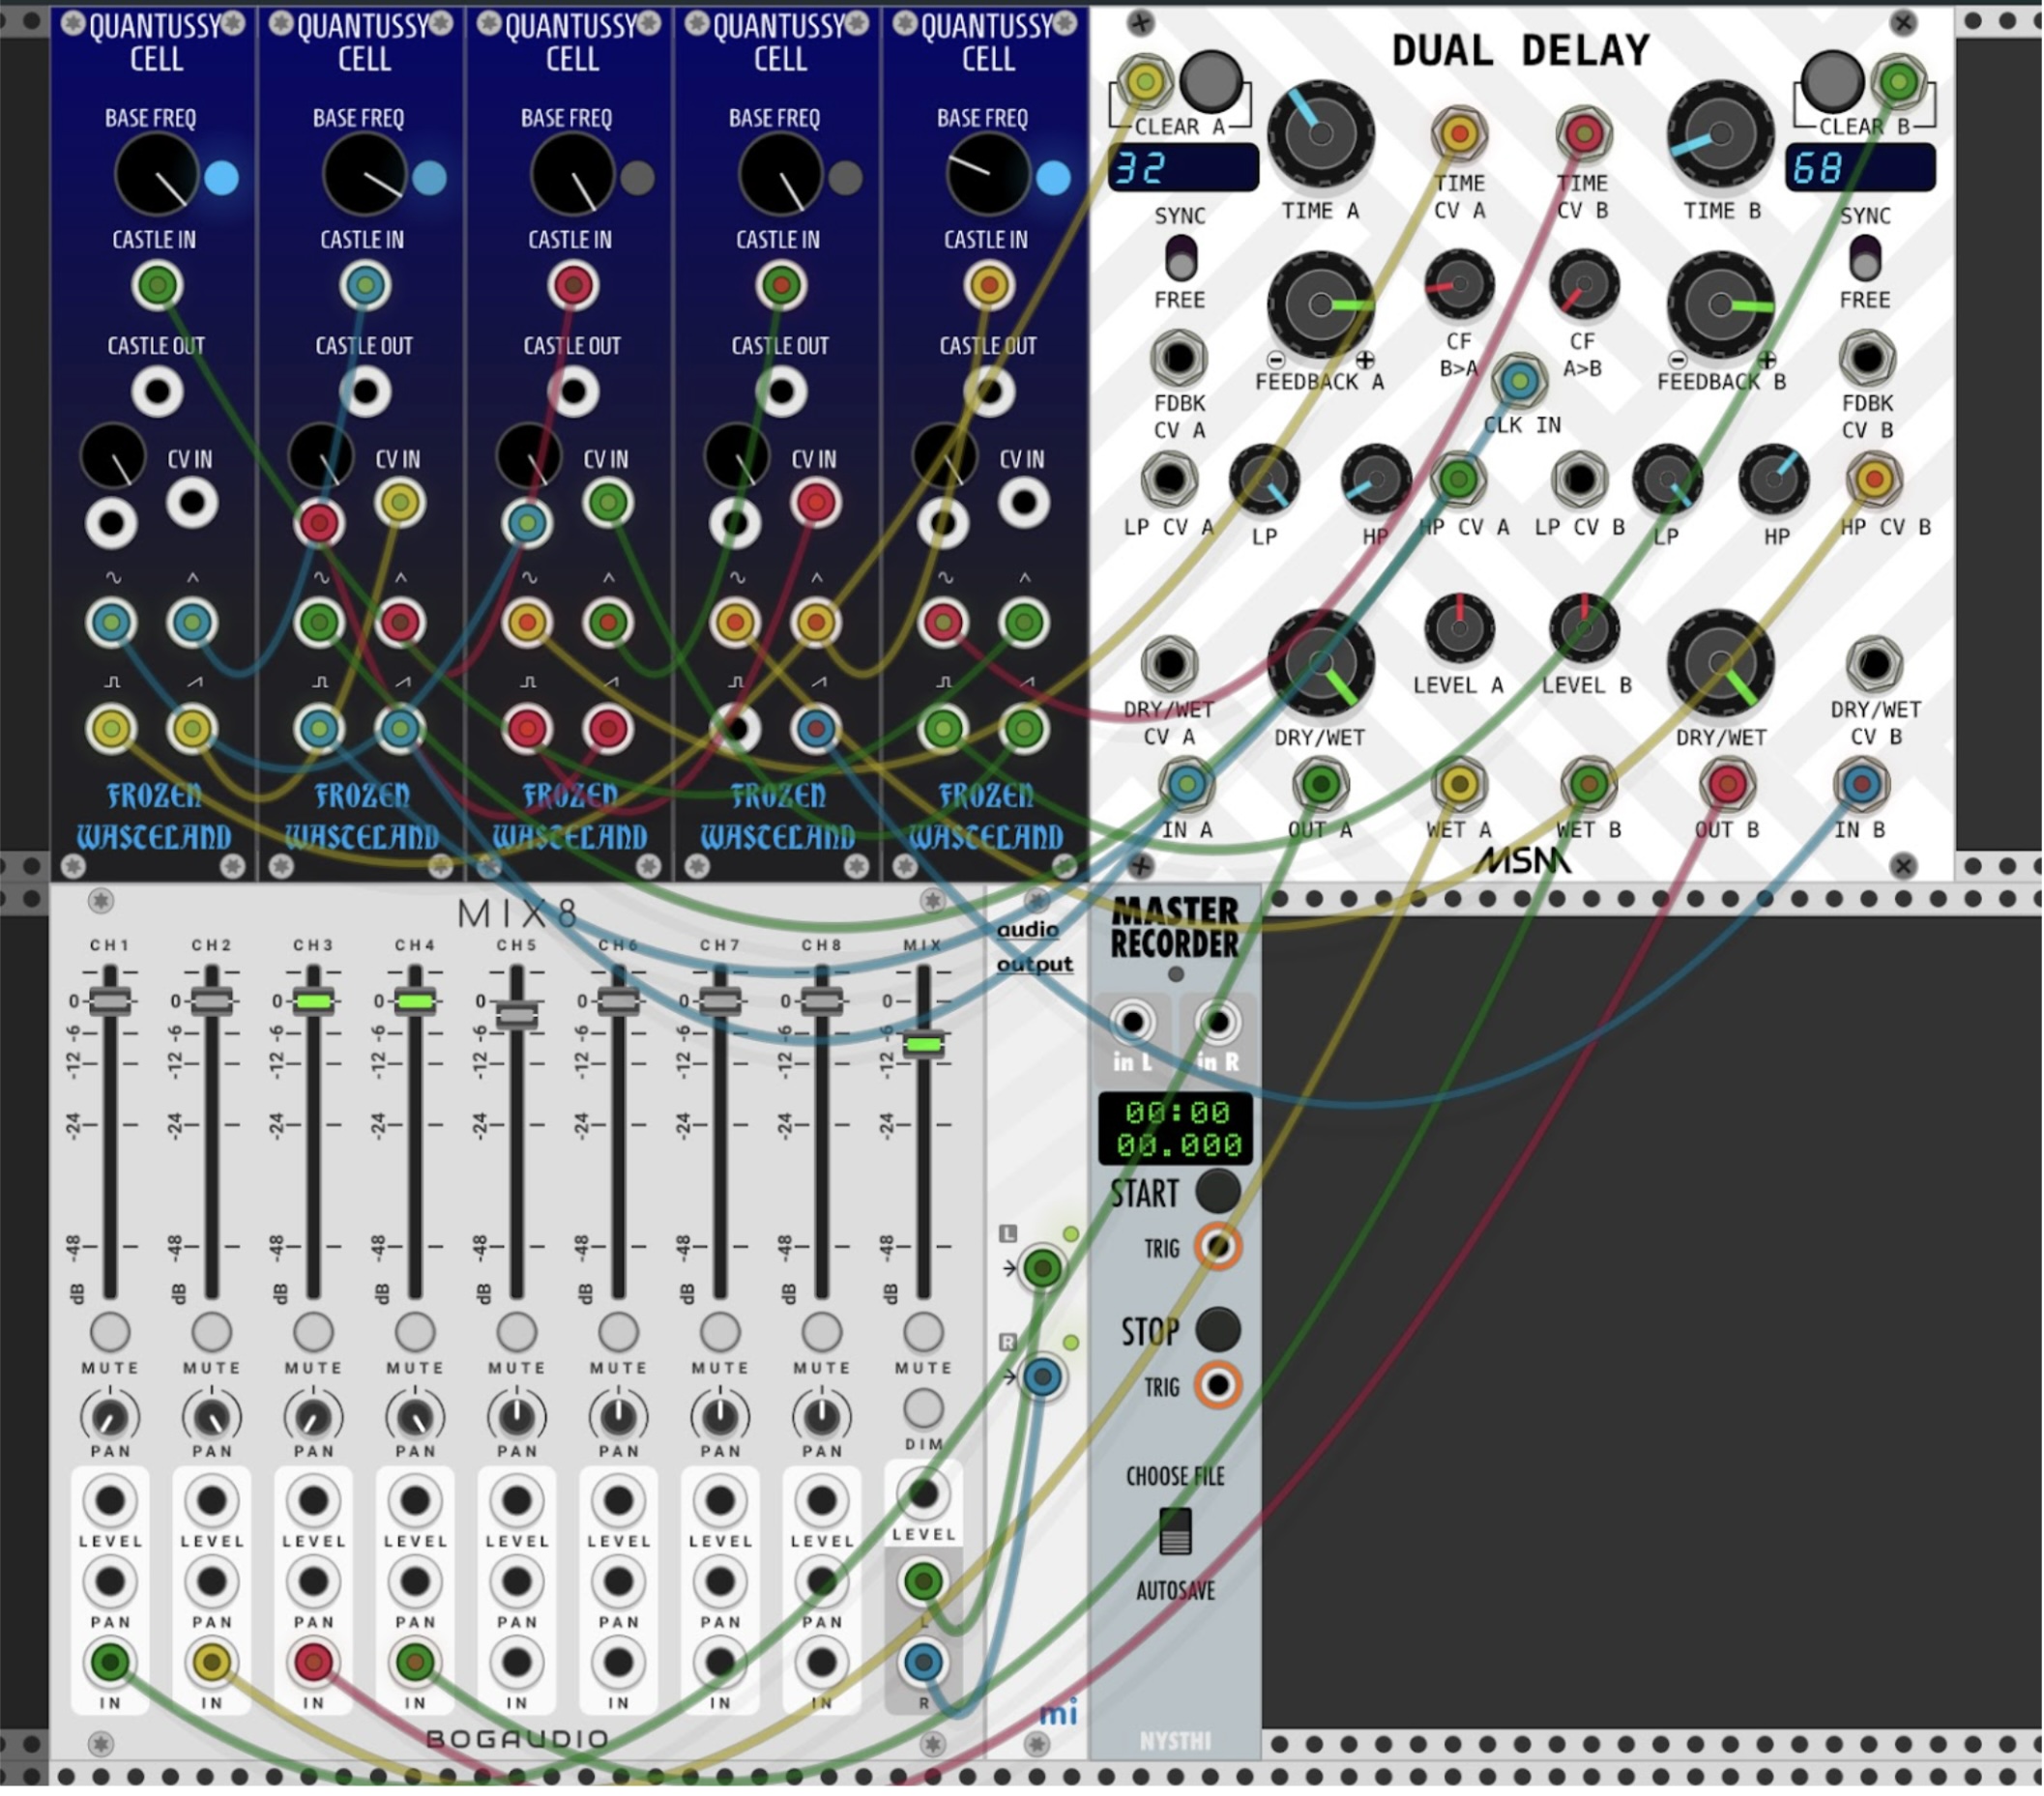
Note, that if you would like to follow along, you can fortunately do so in a couple of ways. One, of course, is that you can try to recreate these patches on Cocoquantus itself if you are lucky to have one. The other way is to forge an emulation of the device in VCV Rack. There are dedicated petal modules, which can be combined into a virtual version of the Quantussy, and you can pair it with a couple of digital delays, an input, and an envelope follower. Here’s an example of how it can look:
Of course, this is not the real thing, you won't get the same results, and not all patches that I will discuss would be possible to mimic closely, however, I think that in the absence of the real instrument, and even if one has it this approach too can be useful for understanding concepts embedded in Cocoquantus, and it is also a great way to generate a wealth of interesting and unique sounds.
Patching The Cocoquantus
Cocoquantus is a quirky instrument. However puzzling at first encounter, these quirks quickly reveal themselves as features and opportunities to use the device in a special way—like a hidden pathway that was noticed by the instrument’s inventor and offered to the user to be explored further…sometimes indiscriminately, others explicitly. An example of the latter happens right on the power-up of the instrument. The center of the instrument lights up in mostly orange colors, but also lit are two red LEDs to the side of each Coco, indicating that the buffer is locked in a loop. This is the default state of Cocoquantus when it is fully unpatched, and the most important thing to note here is that the delay buffers are not empty, but filled with noise—which you can start to hear as you turn the Feedback control. You can clear the buffers, of course, and start from a completely clean slate, and proceed to using the instrument as you’ve initially intended. Alternatively, you can use this state as a basis of your patch and build up on it, and this is exactly what we will do in our first patch example.
Patch 1a and 1b: Self-Noise / No Input Coco
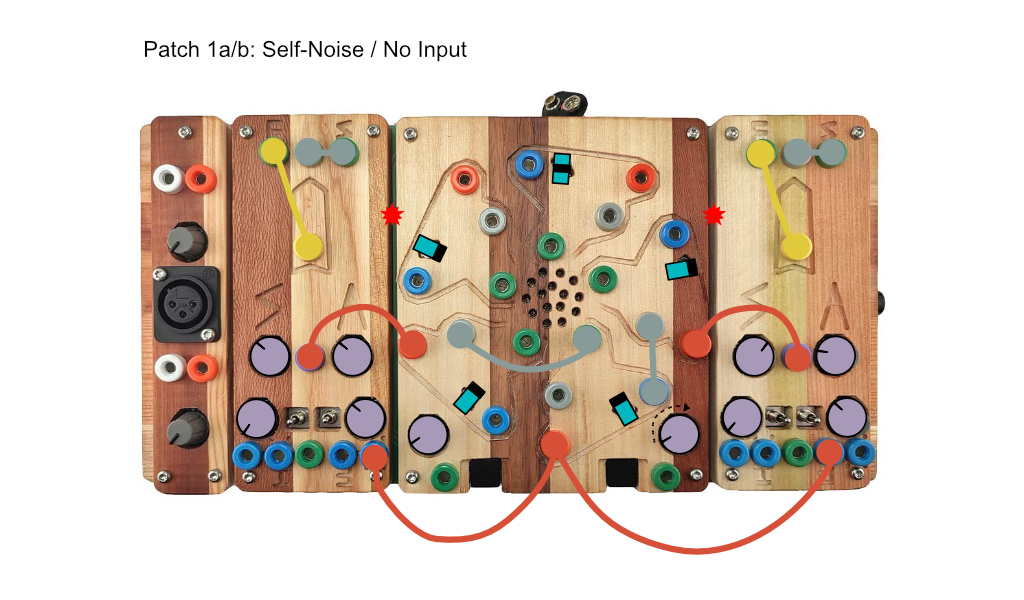
This is a simple patch that you can take in many different directions. Use a couple of oscillator petals set to the LFO range to modulate the delay speed in each Coco. This results in a sound reminiscent of moving ocean waves, or running noise through filters and modulating their cutoff frequencies. From here, we can add amplitude modulation to the sound by sending outputs of any of the oscillators to the verso/inverso VCA inputs of the Feedback channel on each Coco. Note, that you can also make perfectly symmetrical modulation of the stereo field by sending the same VCO output to the verso input on one Coco, and to the inverso input on the other one. From then on, start exploring at your own pace: play with oscillator ranges, adjust the depths of modulation signals, play with frequency and chaos knob, and alter the character of textures by coupling the gray delay output to the Skip input, and/or yellow "organ" output to Flip input.
For the next patch, we will need to clear the Coco buffers. It’s important to know how to do it. First, we take the Feedback control down. Then we disengage the loop buttons—the red light turns off. Lastly, move the Speed knob first all the way counterclockwise, then all the way clockwise. Repeat a couple of times, and now your delay buffers are clear and ready for new explorations.
But we are not connecting anything to Coco just yet. In our next patch, we will dive into the potential of the instrument for no-input mixing type things.
The second patch is essentially the same as the one before, but it starts differently. I recommend removing all of the patch chords and starting from scratch. With buffers cleared up, and with no other signal coming into the instrument, start turning the Feedback control—and this time freely pass the noon mark. Notice how clicks and little noises start to accumulate in the buffer. This is the self-noise of the delay chips cranked up, and it serves as a great sound material. You can collect a desired segment of this digital dust into the buffers, and loop the playback by disengaging the recording. Then you can automate and manually adjust the Feedback control, continuously reshaping the structure of noise.
Play around, and experiment. When done, remove the patching chords, clear the buffers, and let’s move on to another patch.
Patch 2: Quantum Drone
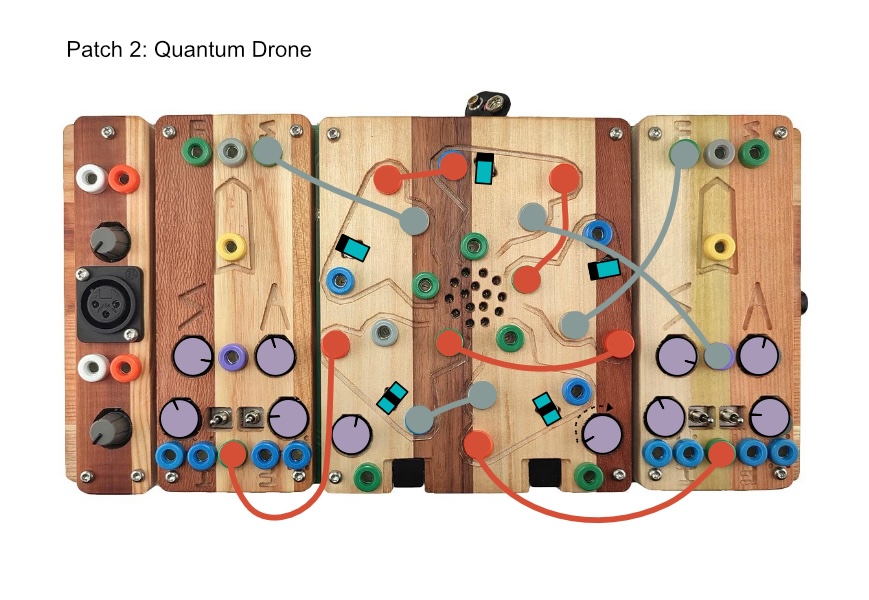
In this patch, we will engage a couple or more of the Quantussy oscillators as sound sources. Start by setting the master frequency to a desired value (I'm starting from eleven o’clock), and default the chaos control to fully off. Next, send a pair of triangle outputs from Quantussy to the green inputs in the Cocos. Note, that can also stack together outputs from multiple oscillators, if you want a denser texture.
Make sure that the oscillators you are listening to are set to audio range (switch in the middle position). Turn the Input level up on both channels, and you’ll hear two related but distinct tones in each channel. From here, start experimenting. Bring the Feedback up a bit on Cocos, and run other oscillator outputs to Skip and Flip, further animate the drone with complex tremolo via modulation to either or both Input and Feedback levels, crosspatch the petals within Quantussy, and so on.
Patch 3: Guitar Multi-FX
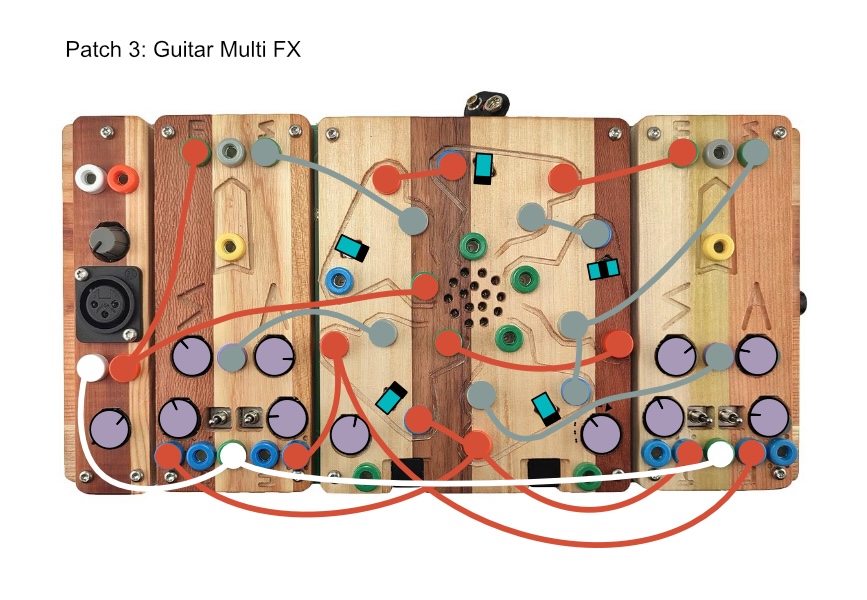
I greatly enjoy using Cocoquantus for processing acoustic and electroacoustic sounds. Given the availability of high-impedance input, the device is well-suited for electric guitar signals. In this context, I like to think of Cocoquantus as an extraordinarily potent modular multi-effect.
Here is a (probably incomplete) list of effects you can achieve with the device: tremolo, vibrato, overdrive/distortion, delay, chorus, looper, granular, and pitch effects. You can explore these effects somewhat individually or in a variety of combinations. Including an envelope follower into the patch opens an additional dimension for interactivity. Experiment with moving this output to different parts of the patch.
Patch 4: Organ Mode
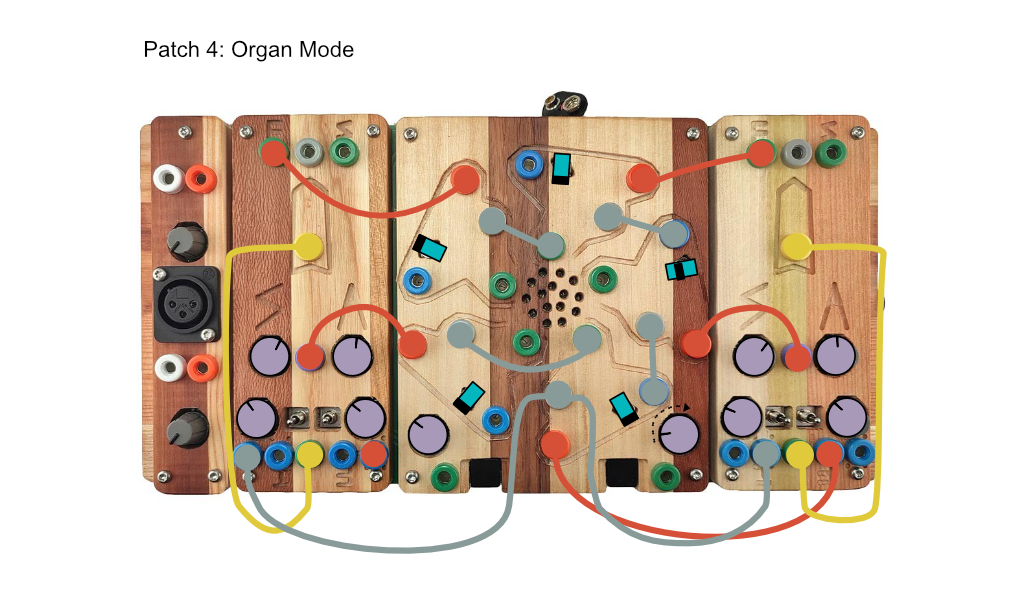
The last patch that I'd like to talk about relates to the yellow aka "organ" outputs on the Cocos. For some reason, I rarely see them used, although they offer a lot of interesting texture. Using them, I've had outcomes that ranged from alien drones to something deceptively close to minimalist organ music.
Run each yellow output into the input on the same or opposite Coco. Note, that the the frequency of the waveform is dependent on the Speed setting on the given Coco—the higher the speed, the shorter the length of the buffer, and the higher the frequency of the "organ" waveform. Modulate the verso/inverso Coco inputs with gray stepped waves from a pair of VCOs set to low-frequency mode. Use two other "stepped" outputs to subtly modulate the frequency of the wave/delay speed—a little goes a long way. Experiment with the ranges of the modulation oscillators, as well as the overall rate and chaos level of the system.
Extra Tip: Cocoquantus, like most banana-format instruments, features a dedicated "Ground" jack. It is typically reserved for interconnecting multiple instruments together so that they have an identical reference voltage. However, you can also use the ground jack on Cocoquantus to extend the existing ranges of the controls. For example, patch the ground jack to the Speed modulation input on a Coco, and the delay buffer gets noticeably longer.
Conclusion
As we have reached the end of this article, I don't think it is quite possible or even necessary to demystify Cocoquantus entirely. Understanding how different elements of the instrument work is one thing—and it is certainly helpful—however, its labyrinthine connections and oscillatory interplays make it seem like a sort of a hybrid between a living organism and a musical instrument.
Cocoquantus croaks, squeals, hisses, roars, and growls, although when you need it to, it can sing soothing harmonies. The many surprises that one encounters with this instrument are rarely obstacles; but rather invitations to dive deeper, to understand more, to listen, to respond, to try something else.
While I've endeavored to share my insights and experiences throughout this article, I admit that the true essence of Cocoquantus is something that is best felt firsthand. It beckons each user to engage, experiment, and evolve with it, revealing layers of complexity and nuance that can't simply be distilled into words. So if you ever happen to come across one, spend some time with it—there is a world of noises to be discovered.
More from Ciat-Lonbarde
 Ciat-Lonbarde Plumbutter 2 Analog Drum + Drama Machine$1,699.00Preorder Reserve your order today!
Out of Stock
We're awaiting our next batch of this item. Pre-order to reserve your place in line and we'll fulfill your order as soon as we receive our shipment Ciat-Lonbarde Peterlin Analog Chaos Synthesizer
- STAFF PICK
$349.00Out of Stock Sign up for stock updates!Out of Stock
We aren't currently accepting pre-orders for this item. Sign up for stock notifications and we'll email you as soon as we receive our next shipmentOut of stock Ciat-Lonbarde Sidrax Organ Wooden Analog Touch Synthesizer$1,199.00Preorder Reserve your order today!
Out of Stock
We're awaiting our next batch of this item. Pre-order to reserve your place in line and we'll fulfill your order as soon as we receive our shipment