This is the second in a 3-part series detailing the journey of a YouTube channel, its vision, delivery and the technology used to create content.
In the first part, I described how I started my own YouTube channel, how it has evolved over the years, and what I think the future may hold.
In this part, I describe the technology I’ve used, how it has changed, and why.
My Tech Journey: Audio
Sound is the most important part of your video. If it sounds awful, then there’s little point in anyone listening. Sure, poor quality images are annoying, but you can still hear a performance, and a lot of people listen to my videos like podcasts—so the images are of no consequence at all to them. Recording the synths or performance with the built-in mic on a camera or phone is a big turn off. If you need to speak and record the performance, you should multitrack. Otherwise you risk not getting your channel off the starting block.
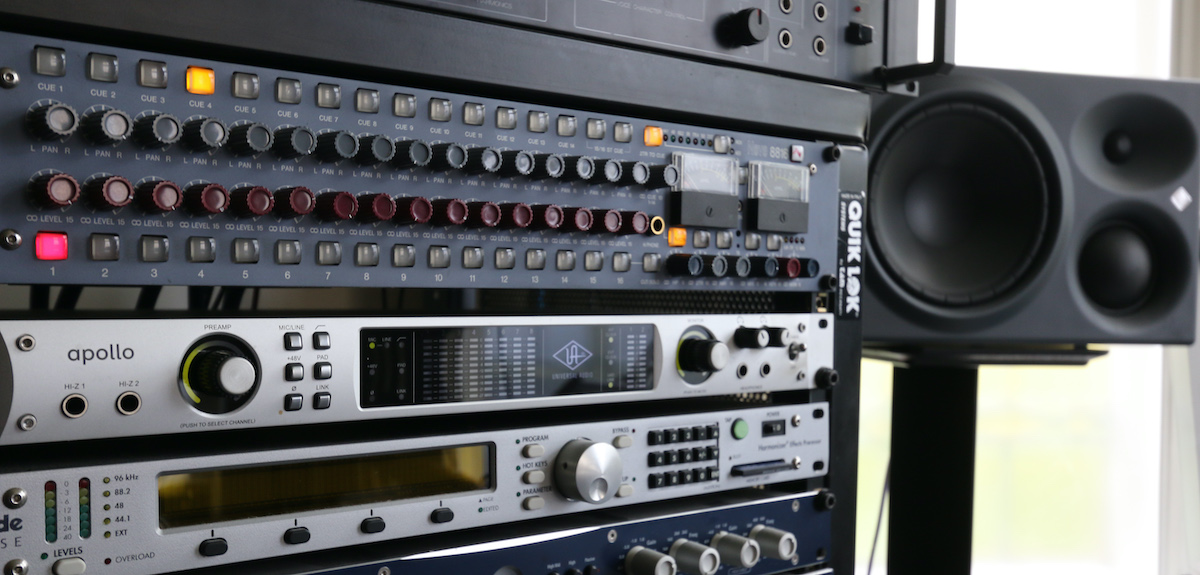
[Above: In the studio I use Neumann KH310s and record via Universal Audio Apollo.]
I originally recorded all synths direct into a Universal Audio Apollo, and my voice was captured by whatever large dynamic mics I had in the studio: Rode NTK, Aston Spirit and Origin. The mics weren’t ideal, as I move my head a lot when moving from synth to synth—so the levels could change dramatically. I tried so many solutions, including various mounts of increasing expense up to the Manfrotto variable friction arm with a Rode NTG4+ shotgun mic in an attempt to improve the vocals.
None of this worked, however, and I eventually settled on using a Sennheiser clip-on lavalier wireless mic set. This means the mic stays with me as I move, but it’s a compromise, as the audio isn’t as rich as using a dynamic mic, plus I occasionally have issues with radio noise that I’ve not tracked down yet. Speaking with other YouTubers, everyone has their own solution—and it will depend on how you’re presenting your videos. If your face isn’t on camera, an SM7B in front of your face may be fine, or a shotgun mic on your camera may work. I now use the shotgun for interviews, either handheld or in a cradle, as do a lot of others.
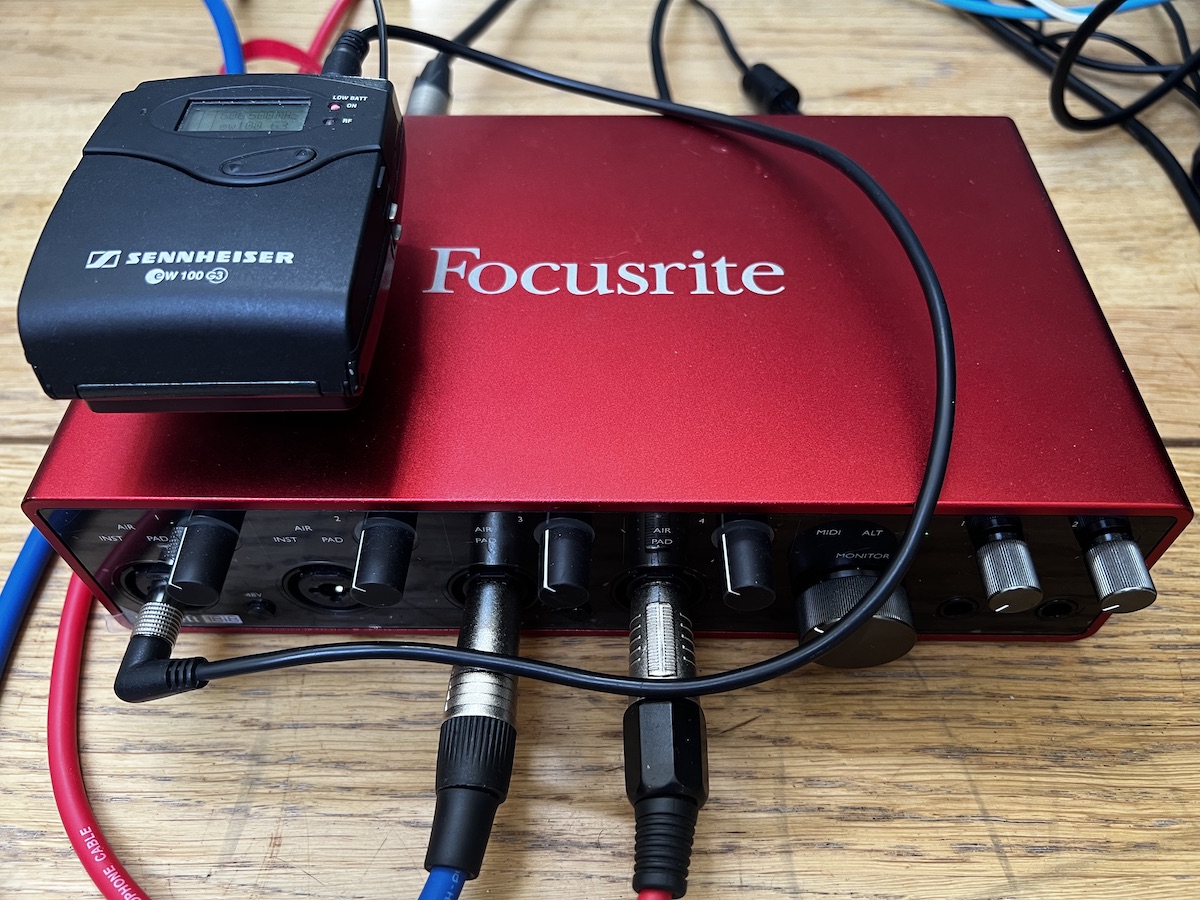
[Above: Always record the kit direct to your interface. Here’s my Sennheiser receiver for the lavalier EW 100 G3 kit, plus the Focusrite Scarlett 18i8 I use when not in the studio. I monitor with a pair of Dynaudio LYD 7s.]
When I started the Clubbing TV show, I moved out of the studio for most videos—so I had to think about the acoustics in a room without audio treatment. My current ad hoc solution is to use heavy blankets clipped around the room. They’re clipped onto tent awning poles that are sitting on iphone holders screwed into lighting stands. I’ve found that using software to reduce reverb isn’t very effective on voiceovers—there are too many audible artifacts.
Without the blankets, it sounds like I’m talking in a cave. The acoustic panels are now on order!
My Tech Journey: Video
For video, I started using a small Panasonic Lumix Leica point-and-shoot pocket camera I had lying round. It was my "holiday photo" camera and didn’t get much use (lets face it...who needs a camera these days?). It did, however, have a 10x zoom lens, which meant I could frame my shots nicely. I tried mounting this on all sorts of strange arms and clamps until I realised that a tripod was the only real solution for my particular circumstance. I could stand it behind me in the studio overlooking my shoulders. In a different space, an arm clamped to a stand or shelf may be more suitable. I bought a tripod that could extend to 180cm tall, which meant I could get high shots and still zoom into the synth with the 10x zoom. It’s always important to frame your shots, which is why I’ve ended up with a zoom lens for smaller bits of kit and for close ups, plus a wide angle lens for larger bits of kit or cramped spaces.
Eventually I upgraded to a Canon EOS 70D with an 18–135mm zoom lens. This allowed me to record higher quality images in lower light and get some nicer close-ups of the synths. That was possible with the smaller camera, but I needed a second angle—so I bought something more flexible that gave higher quality images. This also meant I could buy a wide-angle lens, which is extremely useful for recording larger synths. I bought the Canon EOF 10-22m after watching and reading hundreds of reviews.
I should also mention that all cameras and lenses were purchased used from eBay. As I’m using them for video, a high shutter count isn’t hugely important to me, although you should check the specifics of any camera. The manufacturer will quote a life expectancy, so you don’t want one that’s approaching or beyond this point. If it’s not published in the advert, it’s well worth asking.
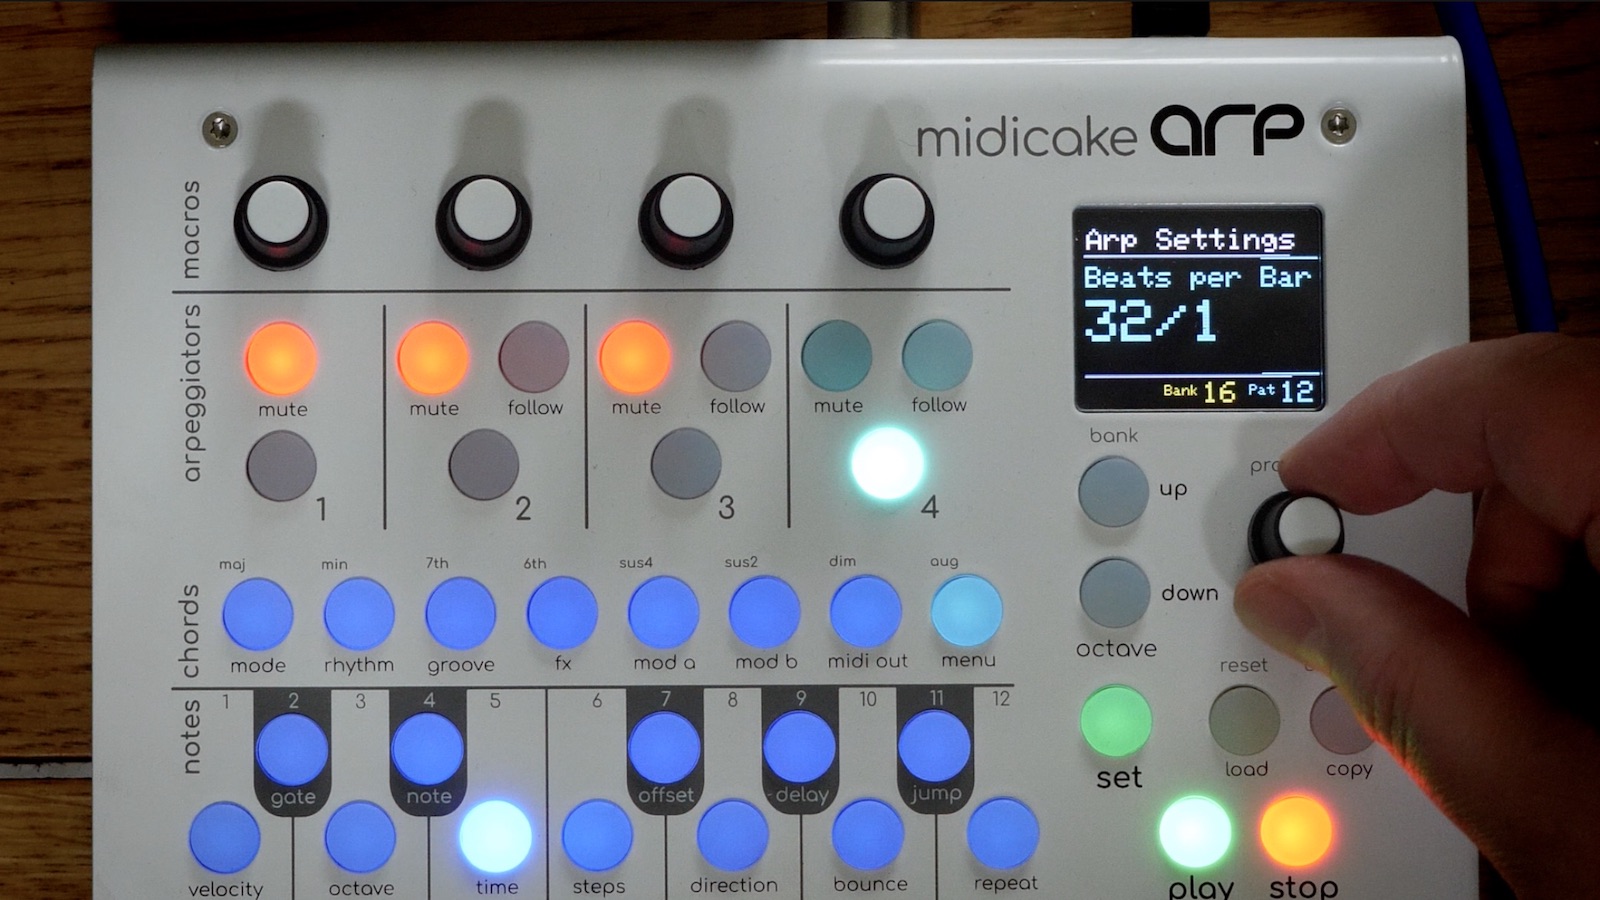
[Above: two shots from the same overhead camera. In the second shot, I'm zoom in for a more detailed look—which can also help with slicker editing from shot to shot or jumping time.]
Once I started the Clubbing TV show, I needed a second camera. I bought a Canon EOS 250D because it can record 4k, and I could use my existing wide angle and zoom lens with it. This wasn’t necessarily so I could upload in 4k, but it enables you to punch into detail in the edit. It gives you the option to zoom into the image to pick up things like screens, or specific sections of the shot, without it looking fuzzy. This was okay, and I’ve used it for a couple of years now...but it’s not ideal. It would sometimes overheat and damage the memory card, corrupting all of the footage. I finally found some Sandisk extreme SDs that would work without failing, but the camera has a couple of other flaws. To change the battery or access the SD you have to take it off the mount. After you’ve spent a while framing your shot and getting everything in focus, this is a real pain. Also, the Canons will only record up to 30 minutes, which is again frustrating if they stop mid-flow, especially if you’ve not realised they’ve stopped.
Last year, I bought a Panasonic GH5 which immediately became my camera of choice. I’ve never had any overheating issues, it records over 30 minutes, and the images look better to me. I have, in the past few weeks, bought another. After speaking with fellow YouTubers [in the next part of this series], I found these were a popular choice we’d all found independently. The only negative anyone mentioned is the autofocus being unreliable when you’re moving in-shot. I always set mine up using the autofocus when framing the shot then switch to manual so they remain in focus throughout. They also highlight the area in focus on the monitor, so you get visual feedback of where the camera is focused, which I find indispensable. There have been occasions where I’ve filmed a whole show only to discover the camera was slightly out of focus on the Canons.
My Tech Journey: Lighting and Stands
I also have a pair of Neewer studio lights with large diffusers. I’ve not used these much, as in the room I use there are skylights and large windows. I’ve learned it’s much easier to record by daylight. Diffusers are a must if you don’t want very directional light. Using the lights would give me a much crisper image but I don’t have space for the stands. Space is always an issue, unless you’re BoBeats and have upgraded to a lovely large and very sexy looking studio space!
It’s natural to want to gradually improve whatever we do, so everything is always under development. Once I free up some floor space when my acoustic treatment is in place, I will probably try using the lights again.
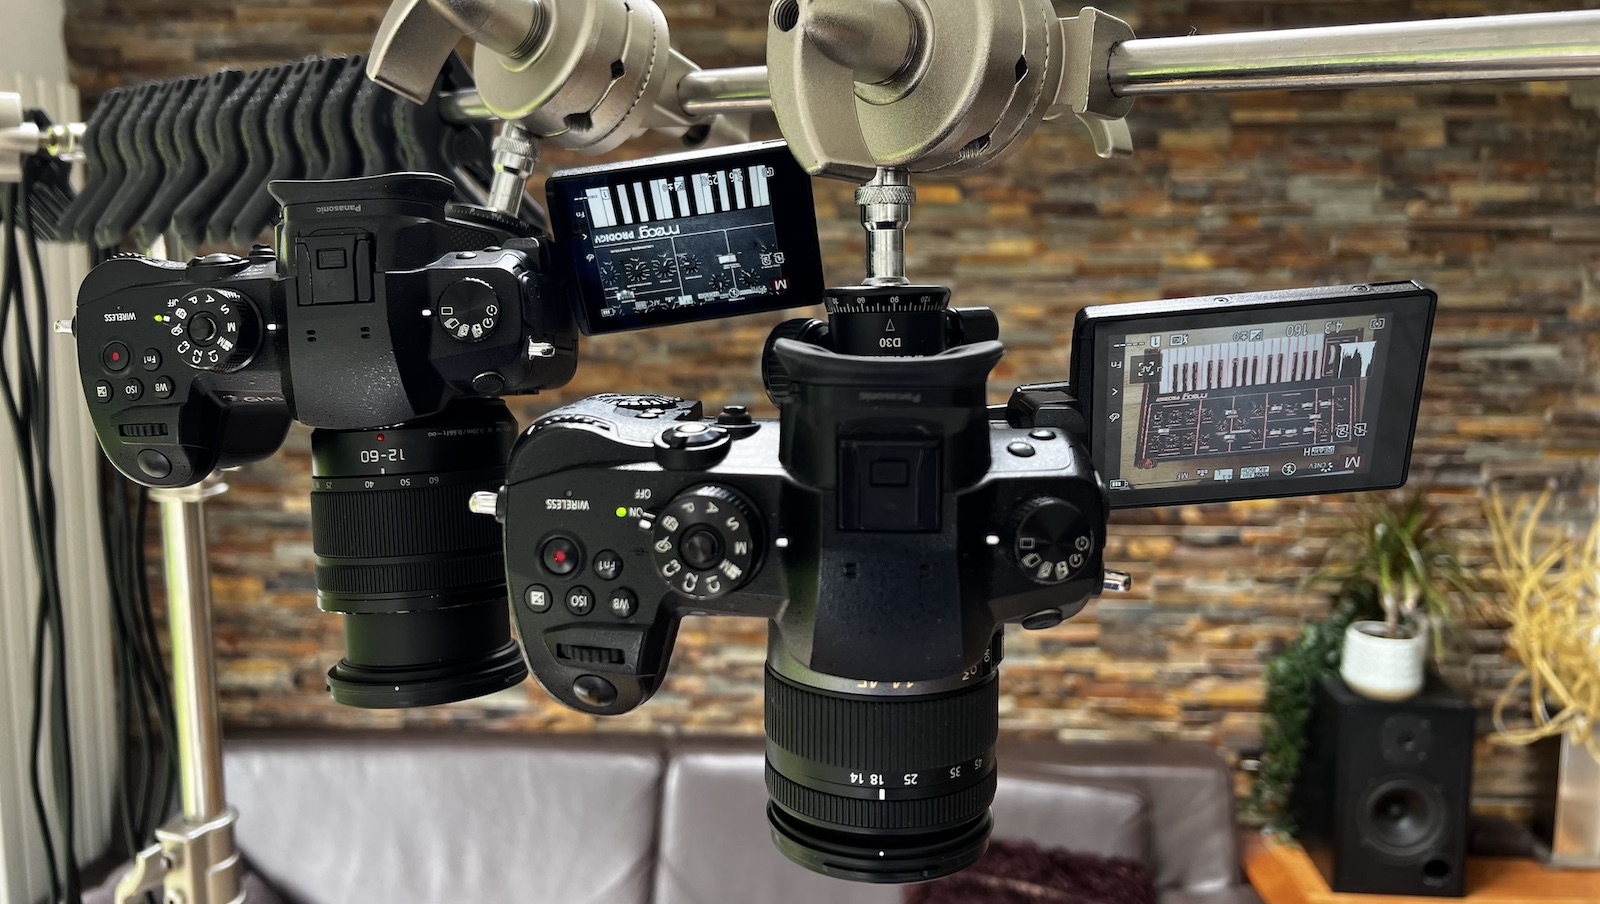
I use a C-Stand for my overhead shots, on which I have a couple of ball heads to hold the cameras. This gives me the option of having 2 angles from above (see above for how this might look—both on the stand, and followed by images from each camera on the same video shoot).
If you’re using a setup like this, then sandbags are essential to counterbalance the weight of the cameras. The C-Stand is also handy for attaching clamps, for holding a GoPro or a mini monitor. I’ve used a 7-inch on-camera monitor, a Feelworld FW759, on a few occasions when I can’t see the camera screen and want to ensure I’m not talking while everything is switched off. I also hoped it would help me to check focus, which isn’t an issue now that I have the Panansonics. Personally, if there was something I bought that was pretty unnecessary it was this, although others think they’re a must-buy.
My Tech Journey: Editing
I normally have a two-camera set-up...but sometimes it's three. The reason for two angles is not only to help the footage look a little more dynamic, but it’s also very useful for editing. Whenever you’re presenting anything there will be errors, or you’ll find better ways of saying and doing things. If you hit a key, for example, and it’s playing the wrong patch then you’ll obviously edit that section out. It looks a lot less jarring if you change the camera angle to another shot of you hitting the key with the correct sound than simply jumping forward on the same camera. B-roll is also useful for this. Some panning and artistic shots of the synth with close ups, and different angles are nice to watch and can cover a multitude of on-camera errors. The 4k punch-in trick is also good for this as well. Using a combination of all of these makes something easier to edit and looks a lot more professional.
I record the audio into separate tracks in Logic, or if I’m using a softsynth, I’ll record separate tracks in GarageBand using a loopback for the Logic Output. The Focusrite Scarlett 18i8 I use when not in the studio has a loopback from channels 11+12, so you set these up as the inputs. The UA Apollo 8 in the studio has a similar loopback function on channels 19+20. If I’m also capturing the screen image for a softsynth, I make sure the screen capture is listening to the mic so I can sync all the video clips using the audio tracks as a guide.

[Above: Using Final Cut Pro for edits. The tracks can build up when using a few synths, multiple interesting B-roll shots, different angles and screen recordings. More time editing usually makes a more professional final product.]
I edit using Final Cut Pro on my M1 MacBook Pro and find it pretty stable. If I have a couple of 4k cameras plus a screen recording, a voiceover, and two or three synths, it can get quite complex very quickly, especially when there are a number of takes. The video files can be quite cumbersome. For the "main" takes in which I’m talking and demoing the synth, I’ll end up with around 10GB for every ten minutes per camera. For a 20 minute video, I’ll normally have around an hour's worth of footage, which is 60GB per camera. I’ll usually end up with a large number of files. Looking at the first two folders on the external disc I currently have plugged in—a comparison of Korg Polysixes is 115GB with 61 files, and my Blofeld project folder is 360GB with 115 files. These are by no means unusual, and include sound files from audio demos. The Blofeld folder includes a Clubbing TV show as well as a YouTube demo etc, but gives an indication of the amount of data you produce when creating content in 4k. I buy a 5TB hard drive every 4 or 5 months and use 256GB in the cameras. The MacBook Pro only has a 1TB hard drive, so I can normally only have one or maybe two projects on the internal SSD at any one time.
All the tracks need syncing and, as I said earlier, I use the audio visualization for this. At the start of a take I clap a few times because the spikes are easy to identify on the audio waves, so I can easily move the files around to match. During the edit I try to remove the microphone take when the synths are playing so you can hear them clearly without background noise, phase issues, or the sound of me hitting the keys. I then start the laborious process of chopping out all the unwanted guff!
Takeaways
I have to stress that this is my workflow—but others may differ considerably. Cuckoo has less edits, as it suits the style of his show. Nick Batt from Sonicstate swaps camera angles as he records, the same way you would if livestreaming. The output is already half-way to being edited. Most I know, however, do something similar to me.
I started with a very budget set-up using what I had lying around, and as the channel picked up pace, I wanted to improve technically. But using my experience as a leg up, you might want to think about 4k video (maybe using your phone), recording synths direct to your interface, and how you’ll position your cameras and frame your shots. But always remember, sound is king!
In the next and final part of this series, I speak to a few of my fellow YouTubers about their individual set-ups and processes.